This is pretty simple. Mix ingredients in a bowl. Season as if you are preparing hamburgers, and then add a couple tablespoons of parsley, red onion, and maybe a tablespoon of chopped garlic.
Lightly shape meat around a skewer until it forms what looks like a hot dog. Don't press meat too hard or it will get tough. Now just grill over high heat until done to your likeness.
We've been meaning to add this post for a long time. Before I get the electric chair, I'm going to order baby back ribs with cornbread and mac n' cheese. Enough said. This recipe comes from Weber's Charcoal Grilling. We cut the proportions in half, but feel free to double it if you think you can eat 4 racks of ribs.
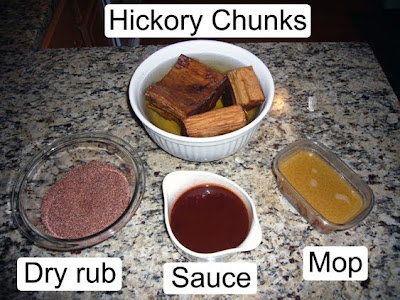
Barbequed ribs are initially seasoned with a dry rub, kept moist during cooking with a mop (no, not that mop), and finished off with barbeque sauce. Make the dry rub first and then prepare the mop and sauce as the ribs cook.
Ingredients: 2 racks baby back ribs, 2 - 2.5 lbs each 4 chunks hickory wood (not chips), soaked in water for several hours
Dry Rub 1 tablespoons sea salt 1 tablespoons paprika 2 teaspoons granulated garlic 2 teaspoons chili powder 1 teaspoon ground black pepper 1 teaspoon cumin
Barbeque Sauce 3/4 cup apple juice 1/2 cup ketchup 3 tablespoons cider vinegar 2 teaspoons soy sauce 1 teaspoon Worcestershire sauce 1 teaspoon molasses 1/2 teaspoon chili powder 1/2 teaspoon granulated garlic 1/4 teaspoon ground black pepper
Mop 1/2 cup apple juice 1 1/2 tablespoon cider vinegar 1 tablespoon unsalted butter 1 table spoon barbeque sauce (from above)
1. Mix the rub ingredients.
2. Remove the silverskin from the back of each rack of ribs. You'll need to loosen some of it with a very sharp knife and then pull it away from the meat with a paper towel while you hold the ribs down. This step is very time consuming if you don't know what you are doing (us included), so get a butcher to do it if you can.
3. Season the ribs with the rub, putting more on the meaty side. Do not press the spices into the meat.
4. Prepare a two zone fire for low heat (with maybe 10-12 coals pushed to the side of the grill), between 250-350 degrees Fahrenheit. Make sure the coals cover no more than 1/3 of the surface of the grate. Place a large disposable drip pan on the empty side of the charcoal grate. Fill the pan about halfway with warm water.
5. Arrange the ribs on a rib rack, with all the ribs facing the same direction. Make sure the ribs are as far away from the coals as possible, with the bone sides facing towards the charcoal.
6. Drain 2 chunks of the hickory and place them on top of the charcoal. Close the lid and close the top vent about half way. Let the ribs cook and smoke for about an hour. During this time, maintain the temperature between 250 and 350 by opening and closing the vent.
7. In a small saucepan, mix the barbeque sauce ingredients. Simmer for a few minutes over medium heat, and then remove the saucepan from the heat.
8. After the first hour of cooking, add 8 to 10 unlit charcoal briquettes and the remaining 2 hickory chunks (drained) to the fire. At the same time, lightly baste the ribs with some mop. Leaving the lid off for a few minutes while you baste the ribs will help the new briquettes to light. Close the lid and cook for another hour. During that time, maintain the temperature carefully.
9. After 2 hours of cooking, add 8 to 10 briquettes to the fire. Remove the ribs from the rack, spread them out on a clean work areas and baste them thoroughly with some of the mop. Put them back in the rib rack, again all facing the same direction but this time turned over so that the ends facing down earlier now face up. Also position an ribs that appear to be cooking faster than the others toward the back of the rib rack, farther from the charcoal. Let the ribs cook for a third hour. During that time, maintain the temperature.
10. After 3 hours of cooking, check to see if any rack is ready to come off the grill. They are done when the meat has shrunk back from most of the bones by 1/4 inch or more. When you lift a rack by picking up one end with tongs, the rack should bend in the middle and the meat should tear easily. If the meat does not tear easily, continue to cook the ribs. The total cooking time could be anywhere between 3 to 4 hours. Not all racks will cook in the same amount of time. Lightly brush the cooked ribs with some sauce and, if desired for crispiness, cook them over direct heat for a few minutes. Transfer to a baking sheet and tightly cover with aluminum foil. Let rest for 10 to 15 minutes before serving.
We cooked these nuts as a snack when a vegan friend (Chris) came to visit. After 20 minutes of smoking over hickory chips, these nuts tasted a lot like bacon. He didn't complain.
Ingredients 1 teaspoon light brown sugar
1 teaspoon rosemary, chopped
1/4 teaspoon ground cayenne pepper
2 cup mixed salted nuts (pecans are mandatory, cashews, almonds, etc)
2 teaspoons extra virgin olive oil
2 handfuls hickory wood chips, soaked in water for a couple of hours
Instructions
Mix the brown sugar, cayenne pepper, and rosemary. Pour the nuts in a 9 x 13-inch heavy-duty foil pan (or any pan coated with foil, as shown below). Add the oil and seasonings and coat the nuts.
Prepare a two-zone fire for low heat (250 -350 degrees Fahrenheit). Basically, you want to let the coals heat up until they turn gray and move them to one end of the grill. Put the lid on and wait for the temperature to stabilize. Drain the water from the bowl of wood chips and dump one handful on the hot coals.
When the chips begin to smoke, place the tray of nuts on the grate, away from the coals. Close the lid with the vent holes open over the nuts so the smoke passes over them on the way out. Let the nuts smoke for 10 minutes. Then open the lid, stir the nuts, place another handful of chips on the coals and close the lid for another 10 minutes. Remove the nuts and let cool in the aluminum tray.
Smoked nuts recipe can be found in the Weber's Charcoal Grilling cookbook that Tim got for Christmas (best present ever?)
Do we even need a recipe for hamburgers? Yeah, we do. It isn't hard to make an average burger, but the perfect one is elusive. Like any recipe, some aspects of burger preparation are arbitrary. But there are a few rules. Follow them, pick the toppings of your choice, and you'll never order a burger at a restaurant again.
So what is most important to grilling a good hamburger? 1) Use ground chuck. You won't regret it. If you can, grind your own chuck at home in a food processor. 2) Sear both sides of the meat over high heat, then finish them off slowly away from the flames. 3) Poke a dimple into the middle of each patty before cooking. This prevents the burgers from poofing into balls.
Ingredients 1 lb ground chuck 1/2 teaspoon salt 1/3 teaspoon fresh cracked black pepper Buns Red onions
Instructions Mix the meat, salt, and pepper just until they come together. Don't ever do it. Carefully form 1/3 of the meat into a patty. Only compact the meat to the point where it won't fall apart. Use a finger to make a quarter-sized indentation into the center of each patty, about half and inch deep. Keep in mind that the meat will shrink a bit on the grill. Slice some red onion and cover lightly with a tiny bit of olive oil. Just enough to coat the slices.
Prepare a two-zone fire on your grill (basically, all the coals on one side). You will know that the fire is hot when you can only hold your hand above the grate without pain for about 2 seconds. Sear the burgers over the coals for 90 seconds per side, then move to the edge of the coals to finish. 3 minutes per side away from the coals should produce medium doneness, but this is different on every grill. You'll have to experiment on you own. After you move the meat away from the high heat, place the onions directly over the flames for a couple of minutes per side. Then move away from the heat until they are soft enough for you.
Variations 1) Add a slice of cheese on the top of each burger during the last minute or so of cooking. 2) Freeze slices or 1/2 inch cubes of blue cheese for 20 minutes prior to cooking. Insert the frozen slices inside each patty as you form them. The cheese will unfreeze, but won't melt while on the grill. This is called the "Andrew Sweeny Deluxe." 3) Mix in some ancho chili powder with the meat and top the finished burgers with some avocado slices.
After trying a few different jerk marinades, we found a clear winner in Weber's Charcoal Grilling--The Art Of Cooking With Live Fire. You can change the proportions as much as you want, but a few things are fundamental: 1) Chili's are your friend, particularly spicy ones like serranos or habaneros 2) Dark meat is the best, especially drumsticks. Don't even think about using breasts. 3) Cook over low and indirect heat. Invest in some applewood chips to mimic the smokey flavor of authentic jerk chicken, which is traditionally cooked over pimento (allspice) branches.
Ingredients
Marinade 1/2 cup orange juice 1/2 cup lime juice 8-10 scallions, roughly chopped 3 serrano chilis, roughly chopped with seeds. 3 garlic cloves, roughly chopped 2 teaspoons dried thyme leaves, or 1 tablespoon fresh 1 tablespoon ground allspice 1 tablespoon salt 2 teaspoons black pepper 1 teaspoon cinnamon 1 teaspoon dry mustard 1/4 teaspoon freshly grated nutmeg
10 chicken drumsticks 2 large handfuls applewood chips, soaked in water for a couple of hours
Instructions Combine marinade ingredients in a blender until all the solids are liquified. Remove loose pieces of fat from the chicken. Cut a few slashes into the meat of each drumstick to allow the flavors and smoke to penetrate to the bone. Combine the drumsticks and marinade in a ziplock bag and let marinate in the fridge for at least 8 hours.
Prepare a two-zone charcoal fire for low heat. You won't need to fill your chimney all the way to the top, so perhaps 1/2 way full is ideal. Once the coals are hot, dump them off to the side of your grill so that they take up only 1/3 of the surface area. Close the lid and wait until the internal temperature drops to about 350 degrees fahrenheit. "Low" grilling is generally considered to be between 250 and 350 degrees, so you need to start at a hotter temperature to account for the drop in temperature that will surely occur. Once the temperature has stabilized, drain half of the wood chips and place on top of the coals. When they start to smoke, place the drumsticks skin side down on the grate as far away as possible from the coals. Save the marinade. Close the lid and let them cook for an hour. Place the holes of the lid over the chicken to ensure that the smoke passes over the meat as it exits the grill. Keep an eye on the temperature and add 8 unlit briquettes if the temperature drops to 250 or less.
Bring the remaining marinade to a boil to kill the germs from the raw chicken. Flip the drumsticks over after the first hour is complete. Brush some marinade on both sides. Place the rest of the wood chips on the coals, close the lid, and let them cook over low heat for another hour.
The skin can get a little rubbery from the low temperature cooking, so throw some new coals on the fire after 2 hours of grilling to start a medium-heat fire. Finish off the drumsticks for a couple of minutes per side over the fire to crisp the skin.
We've tried many other recipes from this book and it is GREAT! It is a helpful grilling resource to help build different types of fires, recognize when food is done by sight or touch, and gives ideas of new things to cook on a charcoal grill.
Apparently, you can grill lobster. We bought some frozen tails and treated ourselves to an extravagant Valentine's Day. We would eat this every day if we could, but we aren't millionaires yet.
Ingredients
2 lobster tails
3/4 of a stick of unsalted butter
3 tablespoons chopped chives
sea salt
Instructions
Prepare the lobster as the charcoal heats up. Use kitchen shears to cut the lobster shells in half lengthwise through the upper and lower shells. Use a knife to slice through the meat. Don't remove the meat from the shell. Insert metal skewers through the lobster and sprinkle with salt. Melt the butter and add the chives. Brush the meat with the butter.
Season the grill grate with some oil and place the lobster (meat side down) on the grill over medium/high heat. Grill for 3 minutes. Tend to the meat carefully because the dripping butter will cause flare ups. Turn the lobster over and grill (shell side down) for about 6 minutes until the meat is opaque, basting with more butter occasionally.
This recipe is from The Language of Baklava. The aromas from the rosemary and hardwood charcoal really go well together. We like to pick up the pieces of chicken with torn up pita bread and top them with plain yogurt.
Ingredients
4 tablespoons olive oil
3 cloves garlic, crushed
juice of 1 lemon
3 teaspoons brown sugar
3 sprigs rosemary, chopped
1/4 teaspoon ground cumin
salt and ground pepper
1/2 teaspoon cayenne pepper
2 lbs boneless skinless chicken breast
Instructions
Mix the oil, garlic, lemon, sugar, rosemary, and spices. Cut up the chicken into cubes for skewers and mix with the marinade in a ziploc bag. Refrigerate for 3 hours or longer, turning occasionally.
Skewer the chicken and cook over hot charcoal. Tear the chicken off the skewers with pieces of pita and top with plain yogurt. This would be great with some roasted tomatoes and onions.
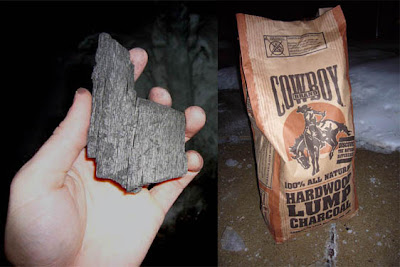
We recently decided to try grilling with hardwood lump charcoal rather than with the usual Kingston briquettes. What is hardwood lump charcoal, you ask? The usual process of making charcoal starts with a slow burning of wood that is densely packed under long metal sheets. The fire slowly moves through the wood burning off everything until you are left with large chunks of pure carbon (hardwood lump charcoal). From here, the wood is mixed with some chemicals (I don't know what they are, but this doesn't sound good to me) and tightly packed into what everyone knows as briquettes.
Why use hardwood lump charcoal?
As far as I know, the point of grilling over an open fire is to sear your food with extremely high heat and hopefully impart some of the wood aroma into your food. Hardwood lump charcoal burns much hotter (and quicker) than briquettes allowing you more control of the grill temperature, produces less ash, has no chemicals, actually smells like wood, and provides a cheap light show (during grilling, small air pockets in the wood pop and send sparks up into the air).
Results
So we grilled some flatiron steaks using this new method and were amazed by the results. The high heat produced an excellent sear without overcooking the inside. I'm pretty sure we'll never go back to Kingston briquettes unless the landlord forbids us from using this stuff (I almost burned down the neighbor's deck).
Save this one for Valentine's Day. Still spicy even if you have a cold.
Ingredients 4 garlic cloves, crushed 1/3 C ancho chile powder 4 t brown sugar 1 t dried oregano 1/2 t ground cumin 4 t black pepper 5 t salt
1.5 lb flank steak 2 black plantains 1 red onion, 1.4 inch slices 1 C chipotle salsa
Directions Heat a very hot charcoal fire. Mix the first 7 ingredients. Now you have enough chile powder for a month. Spread some over the steak. Cut the ends off the plantains and split lengthwise. Oil the cut surfaces of the plantains and onions. Cook the plantains and onions 2-3 minutes per side over hot coals. Add 3 T of salsa and season with salt.
Grill your steak. Don't be a wimp. Stand directly over the fire and let the smoke season your skin. Now you are a man.
The sauce is so good that you'll want to drink it.
Ingredients 1 cup roughly chopped cilantro 2 cloves garlic, roughly chopped 1/2 cup plus 2 teaspoons extra virgin olive oil 3 tablespoons lemon juice 1/2 teaspoon ground cumin 1/2 teaspoon ground chili powder Salt and pepper to taste 2 (10-12 oz) flat iron steaks
Directions Combine the cilantro, garlic, 1/2 cup of the oil, lemon juice, cumin, chili powder and salt in a blender or food processor and purée until smooth. Taste and adjust seasoning. Set sauce aside.
Sprinkle steaks on both sides with salt and pepper. Heat remaining 2 teaspoons oil in a large skillet over medium-high heat. Add steaks and cook to desired doneness, about 3 minutes per side for medium-rare or 4 to 5 minutes for medium.
Transfer steaks to a cutting board, tent with foil and let rest for 5 minutes before thinly slicing. Serve with sauce on the side.