These cookies are made with clarified butter called ghee that gives them a distinct creamy flavor. You can find it in the refrigerated section with the regular butter at Whole Foods, but comes in a glass jar rather than in stick form. This recipe is kind of a commitment and I almost gave up on getting these right, but the end result was definitely worth the effort!
Ingredients 4 T & 1 tsp. powdered sugar 1/2 c. ghee at room temperature 1 c. & 1.5 T all purpose flour unsalted pistachios - remove shells
Instructions Preheat oven to 300 degrees.
Mix powdered sugar and ghee in a large bowl using your hands. It will look like pancake batter (pale yellow & slightly runny). Add the flour and continue mixing by hand until the dough no longer sticks to your fingers. Cover the bowl with plastic and refrigerate briefly (about 10 minutes). Remove from the fridge and knead the dough gently with your fingers. Take a small piece of the dough and form a ball about the size of a ping pong ball. Flatten the ball until it is about 1/4 inch thick and place on an ungreased cookie sheet, and then press one pistachio on the center of the cookie. Do this for all remaining dough - should make about 12 cookies.
Bake at 300 degrees for 8-10 minutes until bottom of cookie becomes lightly golden. Remove pan from oven and allow cookies to cool on the pan for 10-15 more minutes so they can harden before you try to move them.
Note: I used parchment paper on my cookie sheet but that is not required.
This is pretty simple. Mix ingredients in a bowl. Season as if you are preparing hamburgers, and then add a couple tablespoons of parsley, red onion, and maybe a tablespoon of chopped garlic.
Lightly shape meat around a skewer until it forms what looks like a hot dog. Don't press meat too hard or it will get tough. Now just grill over high heat until done to your likeness.
This type of hand-made pasta is denser than gnocchi, and not made from potato. The indentation made in each piece, as with gnocchi, ensures even cooking and makes them look like little ears.
Ingredients
1 C semolina flour
2 C unbleached flour
1/4 t salt
3/4 C lukewarm water
Instructions
Combine the semolina, unbleached flour and salt, and mound it a bowl and pour in 3 - 4 Tbls. water. Mix until the flour has absorbed as much water as possible without becoming hard or dry - not at all sticky. Knead vigorously until the dough is smooth and elastic. This may take 20 minutes. Form the dough into a ball and cover.
To make the 'little ears', pull off a handful of the dough (keep the rest of the dough covered). On a lightly floured board, roll the dough into a rope about 3/4 inch in diameter. Cut the rope into slices no more than 1/8 inch thick to form small circles of dough. Now put one of these circles into the cupped palm of your hand and, with the thumb of the other hand, press and turn the circle at the same time to form a dent in the center that will spread the dough a little on each side. It should look like a small ear, with slightly thicker ear lobes. Repeat with all of the remaining dough, placing the orecchiette on a lightly floured cloth as they are made.
The orecchiette are cooked in the same manner as fresh flour and egg pasta, although they take longer. Watch them carefully and taste frequently for doneness.
Dissolve yeast in warm large bowl. Stir in milk, sugar, salt, oil and 3 cups of the flour. Beat until smooth. Stir in enough remaining flour to make dough easy to handle. Turn dough onto generously floured surface; knead until smooth and elastic, about 7 minutes. Place in greased bowl; turn greased side up. Cover; let rise in warm place until double, about 50 minutes. Punch dough down to release the gas, gather again and let it rest for the second time till doubled. Let the dough rest for a couple of hours or even more... divide to 8 equal parts.
You have several options for shaping the dough. You can either shape the dough into large rings or smaller loaves (resembling hamburger buns). To form a ring roll each piece of dough into a long snake several inches wide and press the ends together firmly to create a circle or oval loaf with a whole in the center.
Beat egg and 2 teaspoons water with fork. Brush each ring with egg mixture and sprinkle generously with sesame seeds. Place loaves, sesame seed side up, on parchment paper. Cover loosely; let rise until double, about 30 - 1 hour. Cover with plastic to keep them moist.
Heat oven to 450F . When the oven is ready, lower the heat to 400F . Bake the Ka'yek for 20 to 25 mimutes or until golden brown and puffed.
Easy. Really bad for you. Delicious. We saw this on the Blue Ridge Baker.
Ingredients:
1 3/4 cup unbleached white flour
2 tablespoon chopped fresh rosemary
1 teaspoon baking powder
1 teaspoon salt
1/2 cup water
1/3 cup olive oil
coarse sea salt
Instructions: Preheat oven to 450 degrees fahrenheit and place baking stone on middle rack.
Combine flour, rosemary, baking powder, and salt in a bowl. Incorporate the water and olive oil. When the dough comes together, knead it 4 or 5 times. Divide dough into 3 equal pieces and roll them out one at a time. Roll out no more than 1/8". Place a piece of parchment on top of each round and gently lift up the parchment with the round attached. Fold the parchment back on itself with the dough. This step is necessary because the dough will be too thin to move to the parchment with your hands. Lightly brush top of each round with additional olive oil and sprinkle with coarse salt. Slip the dough with the parchment onto the baking sheet in the oven and bake for 10-12 minutes, until lightly golden brown.
We've tweaked this recipe a few times, and we're still working on it. Its not hard to find good enchiladas in Chicago, considering the number of authentic Mexican restaurants. Still, we want to learn how to make them ourselves when we don't feel like going out. This recipe comes from (guess who?) Rick Bayless.
Ingredients
3 garlic cloves, peeled
1-2 fresh hot chiles, stemmed and quartered
1 1/2 pounds (10-12 medium) tomatillos, husked, rinsed, and cut into quarters
3/4 cup roughly chopped cilantro
3 tablespoons vegetable oil
2 cups chicken broth
red onion or shallots, thinly sliced
2 cups shredded cooked chicken breast (rotisserie or grilled works nicely)
salt
12 corn tortillas
3 tablespoons Mexican crema, sour cream, heavy cream, or creme fraiche
1 cup crumbled Mexican queso fresco, or shredded melting cheese like chihuahua or Monterey Jack
Instructions
Blend the garlic an chiles in a food processor. Add the tomatillos and cilantro, and process until smooth.
Heat 1 1/2 tablespoons of the oil in a medium saucepan over medium-high. Add the puree and cook, stirring constantly, until the mixture has reduced to the consistency of thick tomato sauce, about 7 minutes. The more you cook down the base, the richer and sweeter the tomatillo sauce will be. Add the chicken broth and simmer over medium heat for about 10 minutes.
Lay out the tortillas on a baking sheet and spray or brush lightly on both sides with oil, then stack them in twos. Slide the tortillas into the oven and bake just long enough to make them soft and pliable, about 3 minutes. Remove from the oven and stack them in a single pile; cover with a kitchen towel to keep warm.
Stir the crema (or its replacement) into the sauce. Taste and season with salt, usually about 1 teaspoon. Spread about 1/2 a cup of the sauce in large baking dish. Dip each tortilla into the sauce, fill with chicken, roll up and place seam side down into the dish. Repeat, placing the tortillas neatly in the dish. Cover the tortillas with the remaining sauce and sprinkle with melting cheese (if you decide to use it). Bake for 10-15 minutes, until cheese is melted. Top with queso fresco, scallions, and sliced red onions (or shallots).
Polenta is one of my absolute favorite things to eat, and in my opinion it appears way to infrequently on restaurant menus. Why is that? It is super easy to make and is a perfect side dish in the winter -- Try serving it with these braised beef short ribs! You can buy polenta in the bulk section at Whole Foods if you just want to buy one cup at a time.
Ingredients 4 cups water pinch of salt 1 cup yellow corn meal (coarse) fresh ground pepper 1 tbsp butter 1/4-1/2 cup grated Parmesan cheese
Instructions Boil water in medium sauce pan. Pour in the cornmeal, whisking constantly until combined. Bring polenta mixture back to a boil then turn heat to low to keep polenta at a simmer (large bubbles will form).
Stir occasionally and cook about 60 minutes or until polenta tastes creamy. If it starts getting too thick to stir add a little more water in 1/3 c increments. I added 2/3 c to mine. Add salt and pepper to taste. After 20 minutes remove from the heat and stir in butter and cheese.
Since we're clearly on a health kick this winter--we recently made this incredible dessert to go with our Valentine's dinner of beef short ribs and polenta. This cake tastes kind of like a melted brownie, and is best served warm with ice cream.
Ingredients 1 stick unsalted butter, plus melted butter for brushing 1 tablespoon unsweetened cocoa powder 1/4 cup plus 1 tablespoon all-purpose flour 6 ounces dark chocolate (70 percent cacao), chopped 1/2 cup granulated sugar 3 large eggs, at room temperature Pinch of salt Confectioners’ sugar for sprinkling
Instructions Preheat the oven to 425°. Brush four 6-ounce ramekins with melted butter. In a small bowl, whisk the cocoa powder with 1 tablespoon of the flour; dust the ramekins with the cocoa mixture, tapping out the excess. Transfer the ramekins to a sturdy baking sheet.
In a medium saucepan, melt 1 stick of butter with the chocolate over very low heat, stirring occasionally. Let cool slightly.
In a bowl, using an electric mixer, beat the granulated sugar with the eggs and salt at medium-high speed until thick and pale yellow, about 2-3 minutes. Using a rubber spatula, fold in the melted chocolate until no streaks remain. Fold in the 1/4 cup of flour.
Spoon the batter into the ramekins. Bake in the center of the oven for 16 minutes, until the tops are cracked but the centers are still slightly jiggly. Transfer the ramekins to a rack and let cool for 5 to 8 minutes.
Run the tip of a butter knife around each cake to loosen. Invert a small plate over each cake and, using pot holders, invert again. Carefully lift off the ramekins. Dust the warm cakes with confectioners’ sugar and serve immediately with vanilla ice cream and fresh berries.
This recipe is only relatively low in fat. And the meat is actually chuck steak, which is basically the same cut of beef as short ribs, but without the bone. Excluding the bone doesn't result in a regrettable loss of flavor, but does cut down on the fat. But don't fool yourself into thinking this is healthy. Try serving with polenta.
Ingredients
3 1/2 lbs chuck steak, trimmed of fat (see figure below)
Sea salt and ground pepper
2 tablespoons vegetable oil
2 large onions, peeled and sliced thin
1 tablespoon tomato paste
6 garlic cloves, peeled
2 cups red wine
1 cup beef broth
4 large carrots, peeled and cut crossswise into 2-inch pieces
4 sprigs fresh thyme
1 bay leaf
1/4 cup cold water
1/2 teaspoon powdered gelatin (a substitute for bone marrow, which helps thicken the sauce)
Instructions
Remove excess fat from the meat. There should be plenty of fat marbled in already, so don't worry about losing flavor. Pat beef dry with a paper towel. Season beef with salt and pepper up to a day in advance.
Adjust oven rack to lower-middle position and preheat oven to 300 degrees fahrenheit. Heat 1 tablespoon oil in large heavy-bottomed Dutch oven over medium-high heat until nearly smoking. Add some of the beef without overcrowding the pan and cook, without turning, 4 minutes on each side. Transfer to a bowl and continue browning beef in batches. Properly browning the meat is critical to obtaining a rich flavor.
Reduce heat to medium, add onions, and cook, stirring occasionally, 12-15 minutes. Add tomato paste and cook, stirring constantly, until it browns on sides and bottom of pan, about 2 minutes. Add garlic and cook until aromatic, about 30 seconds. Increase heat to medium-high, add wine and simmer, scraping bottom of pan with wooden spoon to loosen browned bits, until reduced by half, 8-10 minutes. Add broth , carrots, thyme, and bay leaf. Add beef and any accumulated juices to pot; cover and bring to simmer. Transfer pot to oven and cook, using tongs to turn meat twice during cooking, until fork slips easily in and out of meat, a little over 2 hours. Remove carrots (they should be too soft at this point, but will have added some flavor to the sauce). Add new carrots if you like. Cook meat and carrots for another 20-30 minutes until carrots are a nice texture.
Place water in small bowl and sprinkle gelatin on top; let stand at least 5 minutes. Using tongs, transfer meat and carrots to a bowl and tent with foil. Strain cooking liquid through fine-mesh strainer into fat separator or bowl, pressing on solids to extract as much liquid as possible; discard solids. Restaurants make short ribs a day in advance, refrigerate the sauce, and remove the fat the next day. Consider doing this, because there is really no way to get the fat to congeal quickly enough to spoon it off any time soon. Return cooking liquid to Dutch oven and cook over medium heat until reduced to 1 cup, about 10 minutes. Remove from heat and stir in gelatin mixture; season with salt and pepper. Pour sauce over meat.
We've been meaning to add this post for a long time. Before I get the electric chair, I'm going to order baby back ribs with cornbread and mac n' cheese. Enough said. This recipe comes from Weber's Charcoal Grilling. We cut the proportions in half, but feel free to double it if you think you can eat 4 racks of ribs.
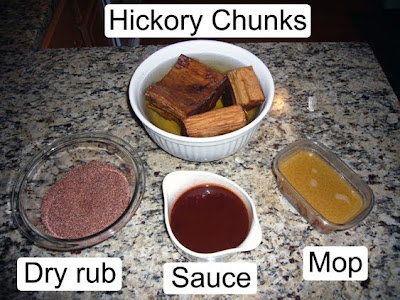
Barbequed ribs are initially seasoned with a dry rub, kept moist during cooking with a mop (no, not that mop), and finished off with barbeque sauce. Make the dry rub first and then prepare the mop and sauce as the ribs cook.
Ingredients: 2 racks baby back ribs, 2 - 2.5 lbs each 4 chunks hickory wood (not chips), soaked in water for several hours
Dry Rub 1 tablespoons sea salt 1 tablespoons paprika 2 teaspoons granulated garlic 2 teaspoons chili powder 1 teaspoon ground black pepper 1 teaspoon cumin
Barbeque Sauce 3/4 cup apple juice 1/2 cup ketchup 3 tablespoons cider vinegar 2 teaspoons soy sauce 1 teaspoon Worcestershire sauce 1 teaspoon molasses 1/2 teaspoon chili powder 1/2 teaspoon granulated garlic 1/4 teaspoon ground black pepper
Mop 1/2 cup apple juice 1 1/2 tablespoon cider vinegar 1 tablespoon unsalted butter 1 table spoon barbeque sauce (from above)
1. Mix the rub ingredients.
2. Remove the silverskin from the back of each rack of ribs. You'll need to loosen some of it with a very sharp knife and then pull it away from the meat with a paper towel while you hold the ribs down. This step is very time consuming if you don't know what you are doing (us included), so get a butcher to do it if you can.
3. Season the ribs with the rub, putting more on the meaty side. Do not press the spices into the meat.
4. Prepare a two zone fire for low heat (with maybe 10-12 coals pushed to the side of the grill), between 250-350 degrees Fahrenheit. Make sure the coals cover no more than 1/3 of the surface of the grate. Place a large disposable drip pan on the empty side of the charcoal grate. Fill the pan about halfway with warm water.
5. Arrange the ribs on a rib rack, with all the ribs facing the same direction. Make sure the ribs are as far away from the coals as possible, with the bone sides facing towards the charcoal.
6. Drain 2 chunks of the hickory and place them on top of the charcoal. Close the lid and close the top vent about half way. Let the ribs cook and smoke for about an hour. During this time, maintain the temperature between 250 and 350 by opening and closing the vent.
7. In a small saucepan, mix the barbeque sauce ingredients. Simmer for a few minutes over medium heat, and then remove the saucepan from the heat.
8. After the first hour of cooking, add 8 to 10 unlit charcoal briquettes and the remaining 2 hickory chunks (drained) to the fire. At the same time, lightly baste the ribs with some mop. Leaving the lid off for a few minutes while you baste the ribs will help the new briquettes to light. Close the lid and cook for another hour. During that time, maintain the temperature carefully.
9. After 2 hours of cooking, add 8 to 10 briquettes to the fire. Remove the ribs from the rack, spread them out on a clean work areas and baste them thoroughly with some of the mop. Put them back in the rib rack, again all facing the same direction but this time turned over so that the ends facing down earlier now face up. Also position an ribs that appear to be cooking faster than the others toward the back of the rib rack, farther from the charcoal. Let the ribs cook for a third hour. During that time, maintain the temperature.
10. After 3 hours of cooking, check to see if any rack is ready to come off the grill. They are done when the meat has shrunk back from most of the bones by 1/4 inch or more. When you lift a rack by picking up one end with tongs, the rack should bend in the middle and the meat should tear easily. If the meat does not tear easily, continue to cook the ribs. The total cooking time could be anywhere between 3 to 4 hours. Not all racks will cook in the same amount of time. Lightly brush the cooked ribs with some sauce and, if desired for crispiness, cook them over direct heat for a few minutes. Transfer to a baking sheet and tightly cover with aluminum foil. Let rest for 10 to 15 minutes before serving.
No joking around with this post. Bolognese is serious stuff. The dish originates in the northern Italian city of Bologna, also known as "the fat city." It is not just a meat sauce; the "true" ingredients are hotly debated. Thank God that the Bolognese delegation of Accademia Italiana della Cucina voted that an authentic rendition only contains beef, pancetta, onions, carrots, celery, tomato paste, broth, red wine, and milk or cream. And the rules don't stop here. The width and thickness of the tagliatelle (fresh egg noodles) with which this sauce is traditionally served are noted by a golden noodle on a plaque in the Bologna city hall.
DONT SCREW UP!
Below are the Ingredients and Instructions, mixed, as you will find them in Alice Waters' The Art of Simple Food.
Ingredients and Instructions
Heat in a large heavy-bottomed pot:
1 tablespoon olive oil
Add:
2 ounces pancetta (or bacon), diced fine
Cook over medium heat until lightly browned, about 5 minutes. Add:
1 small onion, diced fine
1 celery stalk, diced fine
1 carrot, diced fine
2 garlic cloves, finely chopped
5 sage leaves
2 thyme sprigs
1 bay leaf
Cook over medium heat, stirring occasionally, until tender, about 12 minutes.
While the vegetables are cooking, heat in a large heavy-bottomed pan, preferably cast iron:
1 tablespoon olive oil
Add and brown over medium-high heat, in two batches:
1 pound skirt steak, cut into 1/8-inch cubes
4 ounces pork shoulder, coarsely ground
Cook until the meat is a nice chestnut color. Once all the meat browned, pour in:
1 cup dry white wine
Reduce the wine by half, scraping the brown bits off the brown bits off the bottom of the pan. Add the browned meat and the deglazing juices to the tender vegetables with:
2 tablespoons tomato paste
Salt
Measure and stir together:
2 cups beef or chicken broth
1.5 cups milk
Pour enough of this liquid into the pot to bring it to the level of the meat and vegetables. Simmer gently until the meat is very tender, about 2 hours. As the liquid reduces, keep topping it up with the rest of the broth and milk, and skimming the fat that rises to the surface. Near the end, add a couple tablespoons of heavy cream. This helps tie the sauce together. When the meat is tender, remove the sauce from the heat and season to taste with more salt, if needed, add:
This is just one of many ways to make stew. And when you live in a frozen tundra, almost any variety is a winner. But the key to making exceptional stew is browning the meat properly and using good stock.
Below are the Ingredients and Instructions, mixed, as you will find them in Alice Waters' The Art Of Simple Food.
Ingredients and Instructions (cut quantities in half if you don't want to eat this for a week) Season generously, a day ahead if possible:
3 lbs beef chuck, cut into half inch cubes
with
Salt and fresh-ground black pepper
Heat, in a heavy-bottomed pan over medium-high heat:
2 tablespoons oil
Add:
3 slices bacon, cut into 1/2-inch pieces
Cook until rendered and lightly brown but not crisp. Remove the bacon and add the meat, browning well on all sides, in as many batches as necessary. Put the browned meat into a heavy pot or braising dish. Pour off most of the fat, lower the heat, and add:
2 onions, peeled and cut into quarters
2 cloves (stick them into onion quarters)
2 carrots, peeled and cut into 2-inch chunks
2 sprigs each of thyme, savory, and parsley
1 bay leaf
A few peppercorns
Cook until slightly browned and add to the beef in the pot. Return the pan to the stove and raise the heat. Pour in:
3 Tablespoons brandy (optional)
This may flame up, so be careful. Then add:
1.75 cups red wine
Cook until reduced by two thirds, scraping up all the brown bits from the bottom of the pan. Pour this over the beef and vegetables. Add:
3 diced tomatoes, fresh or canned
1 small head of garlic, separated into cloves, peeled, and coarsely chopped
1 thin strip orange zest
2 cups beef stock (or chicken broth)
Check the level of the liquid; it should be at least three-quarters of the way up the cubes of beef. Add more if needed. Cover the pot tightly and cook at a bare simmer on the stovetop, or in a 325 degree fahrenheit oven, for 2 to 3 hours. Check the stew occasionally to be sure that it is not boiling and that there is enough liquid. When the meat is tender, turn off the heat, and let the stew settle for a few minutes. Skim off all the fat. Discard the bay leaf, cloves, and peppercorns. Taste for salt and adjust as needed.
Haifa's dad makes the best pita. We left Thanksgiving vowing never to buy them again (except from Pita Inn). This recipe is adapted from thefreshloaf.com.
Ingredients (makes 8 pita)
3 cups white flour
0.5 cup wheat flour
1.5 - 2 teaspoons salt
1 Tablespoon sugar
1 packet active dry yeast (or, if from bulk, 2 teaspoons yeast)
1 1/4 to 1 1/2 cups water, about 115 degrees fahrenheit
2 tablespoons olive oil
Instructions
Mix the water, sugar and dry yeast. Stir and let sit for about 10 minutes, until it starts to foam a bubble. Mix the yeast mixture with the flour, salt, and olive oil. Work the dough for about 10 minutes in a mixer or with your hands. Lightly coat a bowl with olive oil, place the dough ball inside coating it with some oil, and cover with a damp cloth. Let it rise until doubled in size, roughly 90-120 minutes.
Near the end of the rise, preheat the oven to 500 degrees fahrenheit. This recipe works best with a baking stone. You could also use an inverted cookie sheet. Either way, make sure your baking surface preheats with the oven.
When the dough has doubled in size, punch the dough down to release some of the trapped gases and divide it into 8 pieces. Roll each piece into a ball, cover the balls with a damp kitchen towel, and let them rest for about 30-60 minutes. This step allows the dough to relax so that it'll be easier to shape.
After the dough has relaxed, spread a light coating of flour on a work surface and place one of the balls of dough there. Sprinkle a little bit of flour on top of the dough and use a rolling pin or your hands to stretch and flatten the dough. You should be able to roll it out to between 1/8 and 1/4 inch thick. Repeat with the other pieces and let rest for another 30 minutes.
Place a few pita on the stone and bake. They should puff up in a couple of minutes. Let them bake 30 - 60 seconds after they have puffed. The steam inside will continue to cook them after you take them out.
Pita can be stored wrapped in a towel inside a plastic bag for several days.
Substituting butternut squash for potato in this gnocchi recipe gives it something extra and made this a holiday-themed meal in November. The sweetness of the squash definitely complimented the wine sauce and rosemary. And obviously the melted butter didn't hurt.
Ingredients Gnocchi 1 butternut squash, peeled and seeds removed, cubed 2 tsp extra virgin olive oil 2 cups all-purpose flour, plus extra for dusting 1 cup parmesan 2 egg yolks 1/2 tsp ground nutmeg
White wine butter sauce 4 Tbsp butter 1 sprig rosemary 2 Tbsp chardonnay salt & pepper
Instructions Preheat the oven to 350. Place the squash on a baking sheet, drizzle with the olive oil and salt. Roast in the oven for about 35 minutes, turning once. Remove from the oven and set aside to cool. Transfer to a food processor and pulse.
In a bowl, combine the squash puree, flour, cheese, egg yolks and nutmeg and mix to form a dough. Knead the dough and form into a ball. Break a piece of dough off the ball and roll it into a 1-inch thick rope. Replenishing the flour on your board and hands when necessary, continue to form ropes until you have used up the dough ball. Using a knife, cut each rope into 1-inch pieces. Make thumb prints in each piece of gnocchi so they cook evenly.
Meanwhile, bring a pot of water to a boil.
Next, melt the butter in a pan over medium heat. Add the rosemary and wine, cook until the wine has boiled off, but do not allow the sauce to brown.
When the water is at a rolling boiling, add the gnocchi and boil until the gnocchi rise to the surface, about 3 minutes. Remove using a slotted spoon, holding them over the pot until they have thoroughly drained (you may have to do this in batches), then add gnocchi directly to the butter sauce. Season with salt and pepper and toss to coat with the sauce. Garnish with a bit more cheese and serve.
These pretzels are so yummy that we made them twice in one week. We'll be making them again for the whole family in Ohio this Christmas. Can't get enough.
Ingredients 2 c warm water 3 T sugar 2 1/4 tsp active dry yeast 5-6 cups flour, plus more for dusting 1 T salt 2 tsp vegetable oil 1/4 c baking soda 1 large egg coarse sea salt poppy seeds
Instructions Pour warm water and 1 tablespoon sugar into bowl of electric mixer fitted with a dough hook and stir to combine. Sprinkle with yeast, and let it sit for 10 minutes until it becomes foamy.
Add 5 cups of flour and salt to the yeast mixture, and mix on low speed (still using the dough hook) until it forms a nice dough (usually takes about 10 minutes). If you find that the dough looks wet and too sticky, slowly add in more flour until the dough doesn’t stick to the mixing bowl.
Pour oil into a large bowl and use a paper towel to spread it evenly. Transfer dough to bowl, turning dough to completely cover all sides with oil. Cover with saran wrap or a towel, and let it rise until doubled in size.
Heat oven to 425 degrees. Line two baking trays with parchment paper. Set aside.
Once dough has doubled in size, punch dough down (gently). Divide into 12 even portions, and let this rest for 5 minutes – this makes it easier to roll out and shape the pretzels.
Roll each piece of dough into a foot long strip. Allow each strip to rest again and then twist this into the shape of a pretzel and transfer to the baking sheet.
Once all the pretzels are formed, leave to rise on baking sheets for 10-15 minutes.
Meanwhile, fill a large pot with 2 inches of water, and bring it to the boil. Add baking soda and remaining 2 tablespoons sugar. Reduce to a simmer. NOTE: Do not use a Calphalon non-stick pan to do this!! The baking soda will have a chemical reaction and cause the non-stick to boil away leaving you with poisonous pretzels. Yes, we made this mistake once and probably shaved 10 years off our life.
Transfer two pretzels to the water and poach for 1 minute on each side, and then remove with a slotted spoon. Put pretzels back on baking sheet. Continue until all pretzels are poached.
Beat egg and brush pretzels with egg glaze. Sprinkle with coarse sea salt & poppy seeds.
Bake pretzels until golden brown, 12-15 minutes. Cool on wire rack.
Ingredients Crust 1 1/3 cups all purpose flour 1/2 teaspoon salt 1/2 teaspoon sugar 1/4 cup (1/2 stick) chilled unsalted butter, cut into 1/2-inch cubes 1/4 cup frozen solid vegetable shortening, cut into 1/2-inch cubes 3 tablespoons (or more) ice water 1/2 teaspoon apple cider vinegar
Filling 3 1/4 pounds Granny Smith apples, peeled, cored, sliced 1/4 inch thick 2/3 cup sugar 2 tablespoons all purpose flour 2 teaspoons ground cinnamon 2 tablespoons unsalted butter, melted
Topping 1 cup all purpose flour 1/2 cup sugar 1/4 cup (packed) golden brown sugar 1 1/2 teaspoons ground cinnamon 1/2 teaspoon salt 6 tablespoons chilled unsalted butter, cut into 1/2-inch cubes
Instructions For crust: Mix flour, salt, and sugar in large bowl. Add butter and shortening; rub in with fingertips until coarse meal forms. Mix 3 tablespoons ice water and vinegar in small bowl to blend. Drizzle over flour mixture; stir with fork until moist clumps form, adding more water by teaspoonfuls if dough is dry. Gather dough into ball; flatten into disk. Wrap in plastic; refrigerate 30 minutes.
Position rack in center of oven and preheat to 400°F. Roll out dough on lightly floured surface to 12-inch round. Transfer to 9-inch-diameter glass pie dish. Trim overhang to 1/2 inch; turn edge under and crimp decoratively. Refrigerate while preparing filling and topping.
For filling: Mix all ingredients in large bowl to coat apples.
For topping: Blend first 5 ingredients in processor. Add chilled butter cubes; using on/off turns, cut in until mixture resembles wet sand.
Toss filling to redistribute juices; transfer to crust, mounding in center. Pack topping over and around apples. Bake pie on baking sheet until topping is golden, about 40 minutes (cover top with foil if browning too quickly). Reduce oven temperature to 350°F. Bake until apples in center are tender when pierced and filling is bubbling thickly at edges, about 45 minutes longer. Cool until warm, about 1 hour. Serve with vanilla ice cream.
Ingredients 1 cup butter, softened 1 cup sugar 3 oz cream cheese, softened 1 tsp vanilla extract 1/2 tsp salt 1 egg yolk 2 1/2 cup flour 1 egg white sanding sugar, for decorating Instructions Preheat oven to 350 degrees
In the bowl of an electric mixer, cream together butter, sugar, cream cheese and vanilla. Once fluffy add the salt and egg yolk. (Reserve egg white in a bowl for later. I stuck mine in the fridge to be safe.)
Add flour to mixer and mix until just combined. Do not over mix.
Wrap the dough in plastic wrap and refrigerate for at least 30 minutes to an hour before rolling. The colder the dough the easier it is to roll out because it is extremely soft!
Flour a clean surface and flour your rolling pin. Divide dough into 4 sections (chill sections you are not rolling) and roll each section to a 1/4 inch thickness. Use your favorite cookie cutter.
Dust the flour off the cookies and place on a prepared cookie sheet. Whisk the egg white and brush an egg white glaze on each cookie. Sprinkle with sanding sugar.
Bake for 8 minutes and then let cookies cool for 1 minute before moving to a rack.
This special middle eastern recipe comes to the blog courtesy of Haifa's dad. Spicy red chilis are drained of their moisture before they release their flavor and heat. The result is an olive oil that enlivens just about everything from hummus to grilled meat.
Ingredients 1 cup fresh red chilis (we used thai chilies, but peperoncini or any very hot variety will do salt olive oil
Instructions Using rubber gloves, remove the stems and puree the chilis in food processor until roughly chopped. Using a spatula, move the chili mixture to a mesh strainer and sprinkle generously with salt (see below).
Put something wide and heavy (e.g., a container filled with water) directly on the chilis, then pace the strainer over a bowl in the refrigerator. Let sit for 2 days to allow any water to drain from the chilis. Move the chilis to a small container and cover with about half an inch or more of extra virgin olive oil. Stir the mixture every so often for a couple of days to let the flavors blend. As you use the oil, be sure to add a bit now and then to prevent mold from forming.
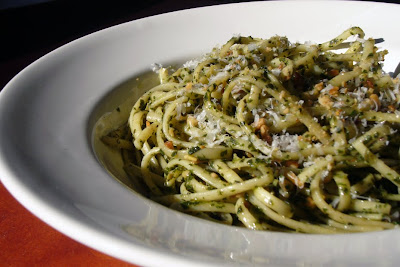
We eat this classic Ligurian sauce with linguine at least once a month. There really isn't a "recipe" for pesto, just a few basic ingredients. Because of this, the quality and proportions of the ingredients are the limiting factors. Use the freshest basil, olive oil, and cheese possible, and experiment with different amounts of each ingredient as you build the sauce. Each batch will be different than the last, and this variability is what makes pesto special.
Ingredients 2 1/4 cups tightly packed basil leaves, washed and dried thoroughly 2 cloves garlic about 1/3 cup extra virgin olive oil sea salt freshly cracked black pepper about 1/4 cup pine nuts parmiggiano-reggiano (or grana padano) cheese linguine (or any type of pasta), fresh if possible
Instructions Toast the pine nuts over medium heat until golden brown. Be careful as they near the end of cooking, as they tend to burn quickly. Crush with a mortar and pestle, or with the back of a knife, and set aside.
Puree the basil, 1/4 cup of olive oil, and garlic in a food processor. Add more olive oil, salt, and pepper in small increments, tasting after each addition, until the sauce tastes good to you. Remember to make it a little stronger than you think is necessary, because it will be somewhat diluted when you add the pasta. Also, be careful not to add too much oil. If you do, the sauce doesn't absorb into the sauce quite as well. Pour into a deep bowl and mix in the nuts. Some recipes recommend blending the nuts with the sauce, but we prefer to add them later to preserve their texture.
Boil your pasta until al dente. Move about a tablespoon of the cooking water to the bowl of pesto before you drain the pasta. After well drained, add the pasta to the pesto and top with an extremely generous portion of grated parmiggiano-reggiano cheese and mix until pasta is coated.
The easiest way to improve your pesto is to use high-quality olive oil. In fact, a good (and usually expensive) bottle of olive oil is always good to have around to supplement a less expensive bottle used for cooking. We started using Palestinian oil and haven't looked back.
If you are really serious about pesto, you can use a mortar and pestle instead of a food processor. Crushing each leaf by hand breaks down the fibers and tends to make a more flavorful sauce. But be warned, you might be too tired to eat by the time you are done.
This bread is a miracle. You get an outstanding loaf for nothing more than the price of some flour, salt, and yeast. And as the recipe says, you don't have to knead the dough. The only catch is that you have to plan in advance to accommodate the 18-hour rise time. Well worth it.
Ingredients 2 cups all purpose flour 1 cup whole wheat flour 1 1/4 teaspoons sea salt 1/3 teaspoon active dry yeast, or 1/4 teaspoon instant yeast
Instructions Mix the flour, sea salt, and yeast in a large bowl. Add 1 and 5/8 cups room temperature spring water. Mix with a spatula until a shaggy ball forms. Cover the bowl with plastic wrap and let the dough rise for 8-18 hours. You know it is ready when bubbles form on the surface.
Dust your countertop and hands with flour. Move the dough to the counter and fold over on itself a couple of times. Place the dough, folded side down, on a cotton towel dusted with plenty of flour. Then place another floured towel over the other side. Make sure the towels aren't terry cloth, and that you use a lot of flour to prevent the dough from sticking. Let rise another 2 hours.
Half an hour before the two hours has passed, heat your oven to 450 degrees fahrenheit with a 3-8 quart heavy covered pot inside. We used a cast-iron dutch oven coated with porcelain, but an enamel, pyrex, or ceramic pot should work too. When heated, remove the pot from the oven and gently place the loaf in the pot, folded side down. Cover and bake 30 minutes. Remove the lid and bake 15-30 minutes more, until a nicely browned crust forms (15 minutes was enough for us).
This is the dutch oven we used (anything from 3 to 6 quarts is fine):